Share WordPress Posts with Integromat
In the process of refining my workflows for this blog, I've been trying out a few different automation tools to minimise the hands-on time needed to manage these menial tasks. After a few experiments with other services, I think I've found winner, Integromat.
It's a pretty powerful service, and it's not limited to WordPress at all. In fact, I'm planning to use it for other tasks involving integration for other things I do online.
Their pricing model is based on the number of operations and quantity of data transfer you use per month. On the free plan, you get 1,000 operations and 100MB of data. That's actually plenty for my current needs, but given the amount of time it'd save me doing these things manually, it's worth the monthly fee if my usage starts to head towards the paid tier ranges. I'll explain about the operations and usage as I go through the workflow ('scenario' in Integromat-speak) below.
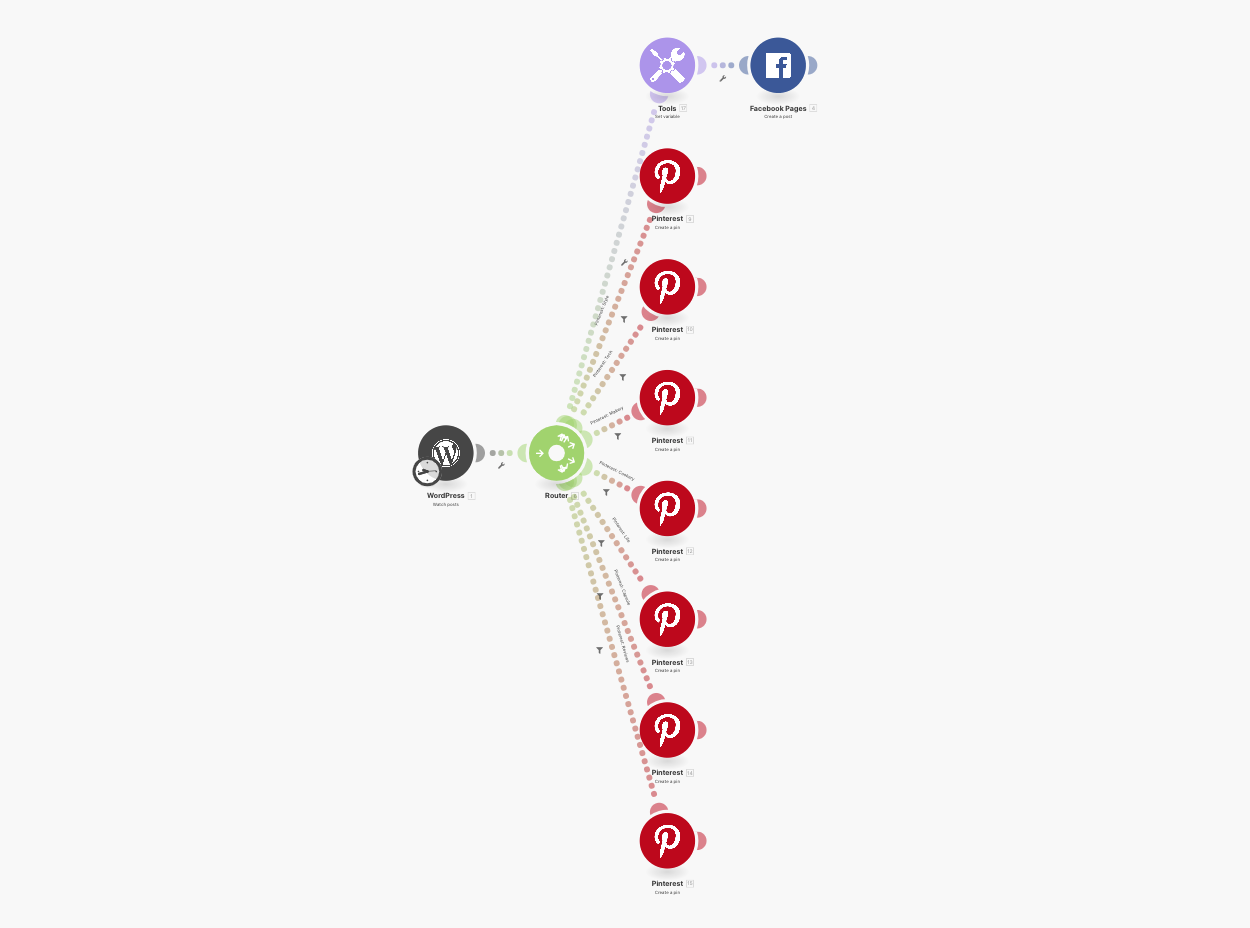
This is a screenshot of my WordPress to Facebook Pages and Pinterest scenario.
Step 1. Set up the data source (WordPress)
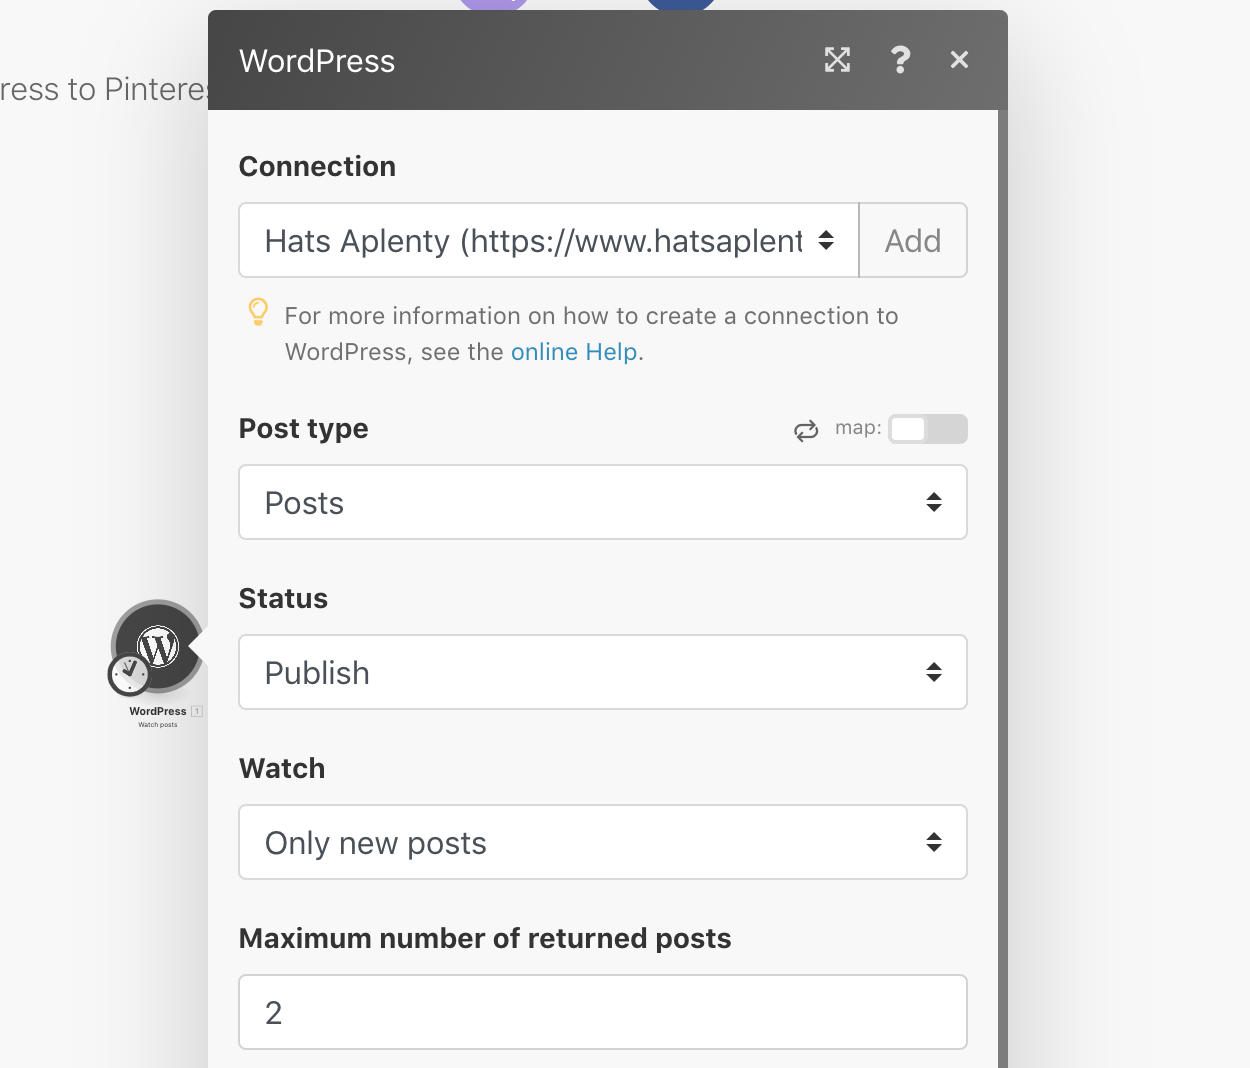
Click on the add button to add WordPress as a service. Connect your website and set the post type and status you want to listen for. Unless you want to send an update every time you update a post, just set it to watch for new posts only.
The number of new posts that will be returned to process should theoretically be just the one if you schedule the scenario to run according to your post schedule. I've set it to two just in case. If there aren't any new posts to process nothing happens anyway.
Step 2. Add a router
If you want to share your WordPress post to multiple destinations, click on the Flow Control tool, and drag a Router onto your scenario. Click and drag one of the little bubbles sticking out of the WordPress operation to the Router operation.
Otherwise, skip to step 3.
Step 3. Set up the Facebook Pages destination
Click on the + in the Router and it will pop up a question mark operation. Click on it to bind it to a module. In this case, Facebook Pages.
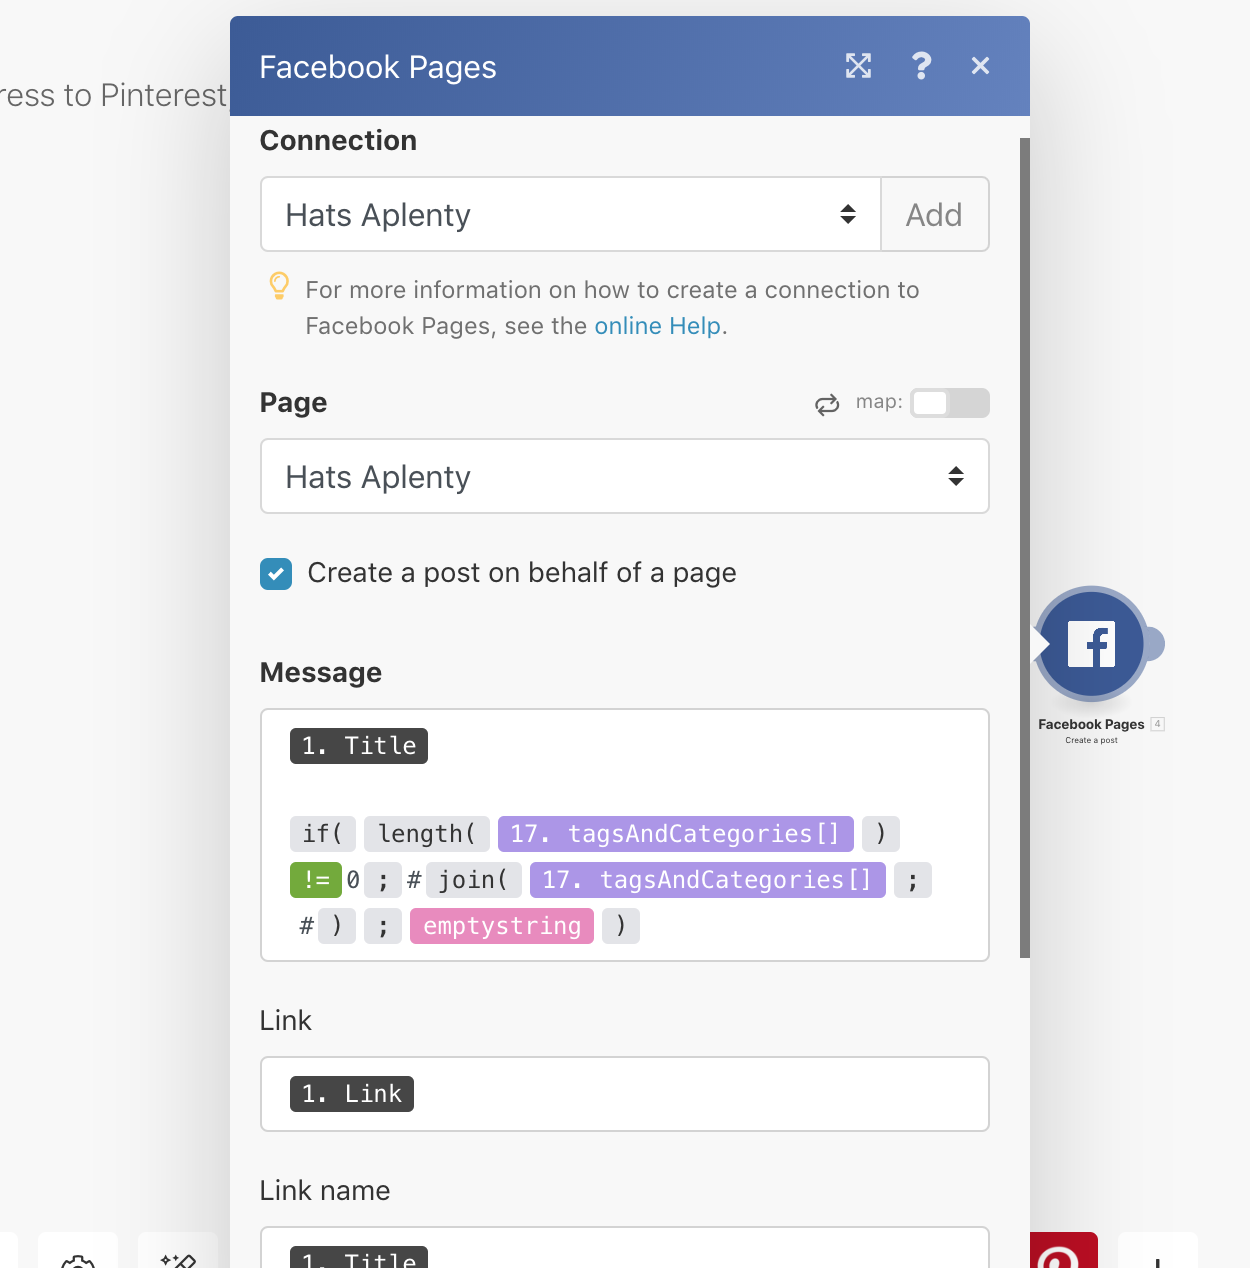
Connect your Facebook account and select the Page you want to share to. Check the box labelled "Create a post on behalf of page".
Set the message to whatever you want the Facebook post to read. When you click on each of these fields, a box will pop up with all the fields from your WordPress post that you can use for content. Unfortunately, it doesn't have excerpt which I would have preferred to use, so I've just used the post title.
Set the link to the Post link field, and the remaining link details to the Post title as I have, or any other field you want to use.
If you want to know what's going on with the extra stuff below the title, check the Bonus Content section below.
Step 4. Set up the Pinterest destination
This one is a bit more interesting, because while you can target multiple Pinterest boards, there doesn't seem to be an easy way to do it programmatically, which is why I've got one Pinterest operation for each board I want to share to.
Pinterest doesn't like people sharing the same content to multiple boards, so even though I have several Pinterest operations here, only one will ever be targeted per post share.
Click on the + in the Router and it will pop up a new question mark operation. Click on it to bind it to a module. In this case, Pinterest.
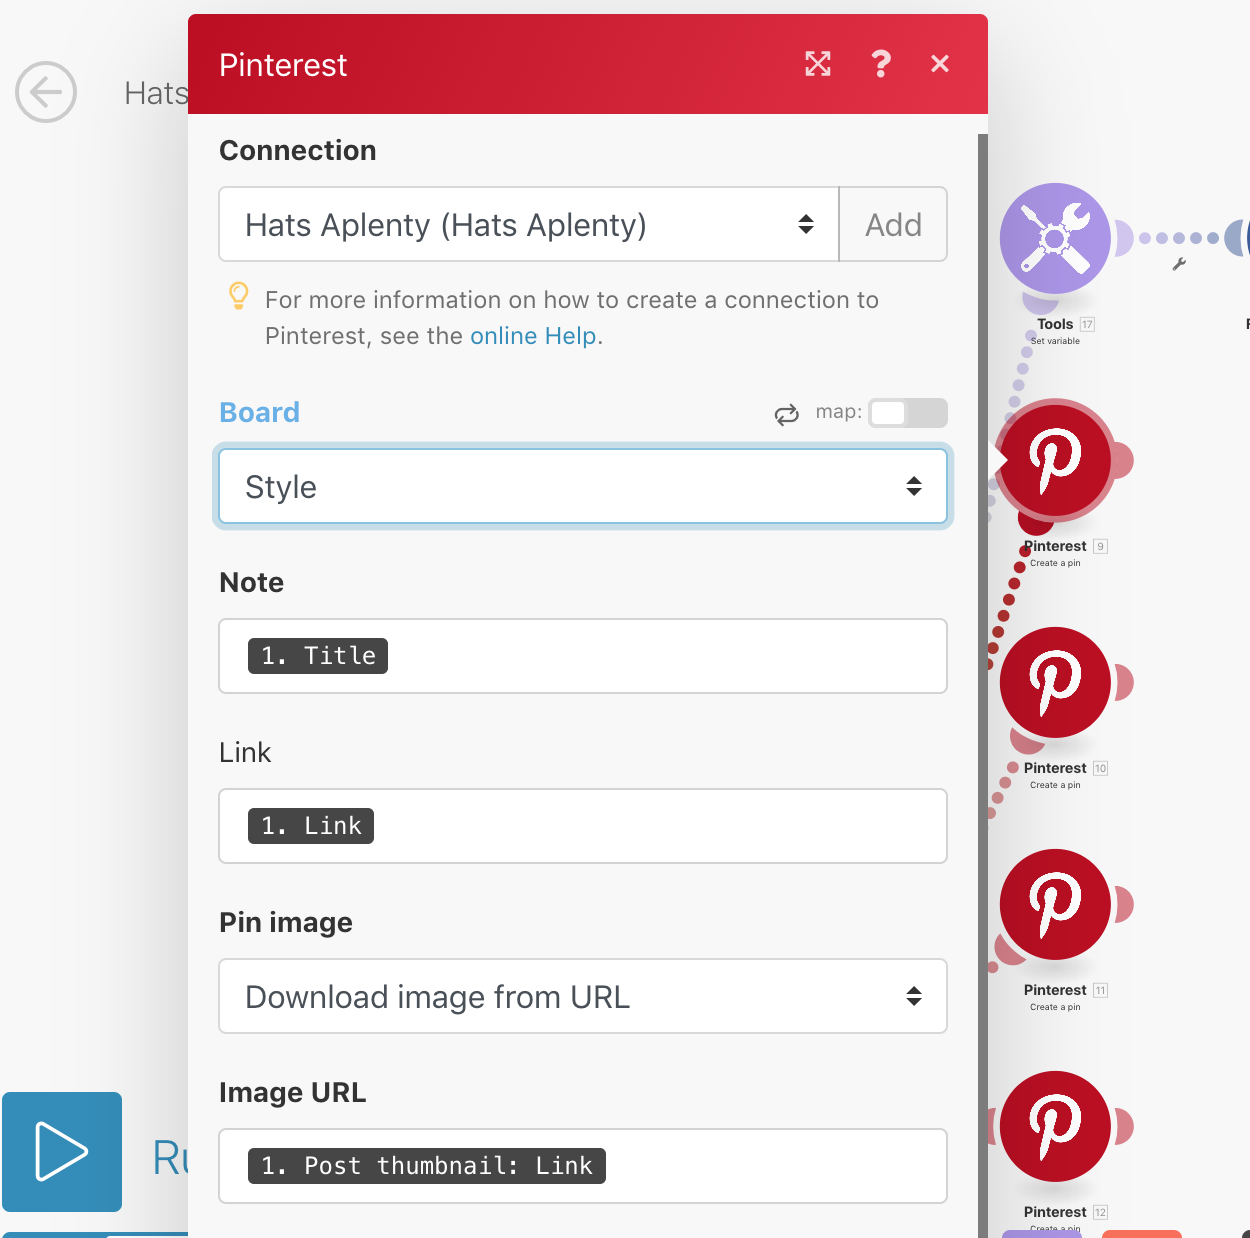
Connect your Pinterest account and select one of the boards you want to target. As with the WordPress operation, set the Note, Link and Image URL to the corresponding post fields. Set Pin Image to "Download Image from URL".
Click on the dotted line that connects the Router and the Pinterest operation to "Set up a filter".
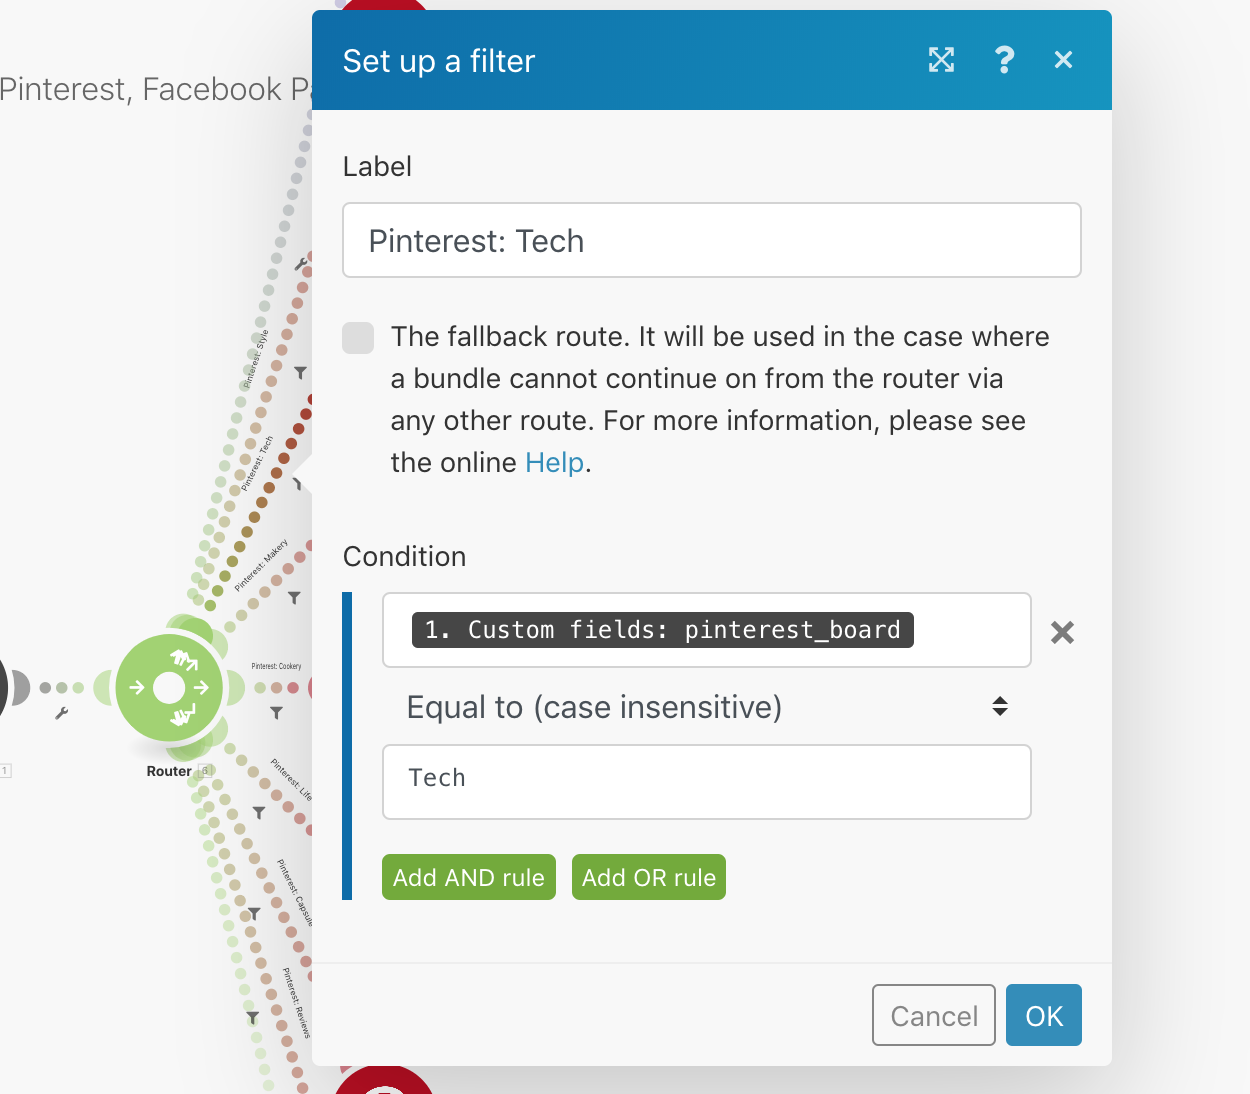
Label your filter and set your condition. In the Condition, if you have a post field that will match your board directly such as a category, use that. If you have a tendency to assign more than one category to a post like I do, you can add a custom field to your post as I have.
In my WordPress posts, I've created a custom field called pinterest_board and for each of my posts, I set this field to the board I intend to send it to. For the Condition, I select this field, with the condition of "Equal to (case insensitive)" and the board name that I'd be using in WordPress.
Repeat this for each of your boards. Make sure the condition you use isn't likely to hit more than one of these routes otherwise Pinterest may penalise you.
Step 5. Schedule the Scenario
At the bottom of the scenario, where the Scheduling section is, toggle the switch to ON, and click on the clock. Set when you want the scenario to run. I've selected the days my posts are scheduled for, and a time that comes after when I schedule them.
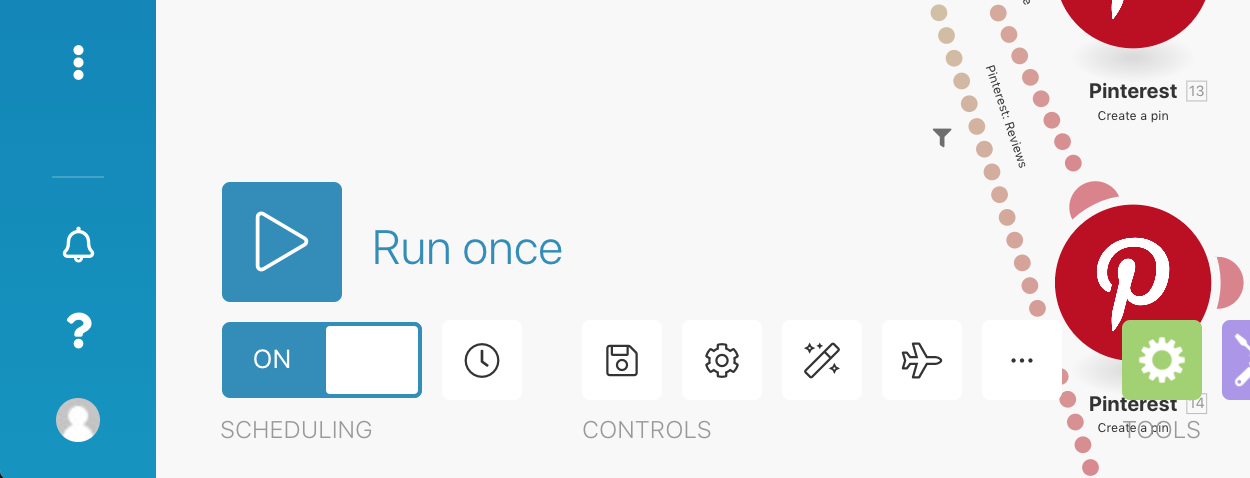
You want to make sure that you are pretty accurate about this, because each time your scenario runs, the operations will contribute to your quota.
With my scenario we have lots of operations, but in theory, only 5 at most will be run each time.
- WordPress
- Router
- Tool for
tagsAndCategories - Facebook Pages
- One of the Pinterest operations
Run 3 times a week, this works out to be about 60 operations, and on average, the scenario uses about 10KB.
I think by default it tries to run every 5 minutes which will blow your operations quota very quickly, so setting the schedule will ensure you're able to optimise your allowance.
Bonus Content
If you want to use your tags or categories for hashtags, you'll need to do a little fancy work here. In my Message field you can see:
if(length(tagsAndCategories) != 0;#join(tagsAndCategories;#);emptyString)
I'll explain about the tagsAndCategoriescustom field shortly, but you can replace this with the Post Categories[]or Post Tags[]fields from the popup. These fields contain a list of your categories or tags.
For those who don't code, what this translates to is:
Check if the length of the list is not zero (ie. there are tags/categories). If it is, turn the list into a string of text that starts with a #, and connected by ' #' (Note that there is no space between # and join, and there's a space before the second #). Otherwise, if there is nothing in the list, return an empty string of text.
As an example, if you have two tags on your WordPress post like "tech" and "guide", this will create text that looks like "#tech #guide".
Now, back to the tagsAndCategoriesthing. I've gotten a bit fancy with this and combined my tags and categories from my post into its own custom list so that I can turn them into hashtags using a Tool operation.
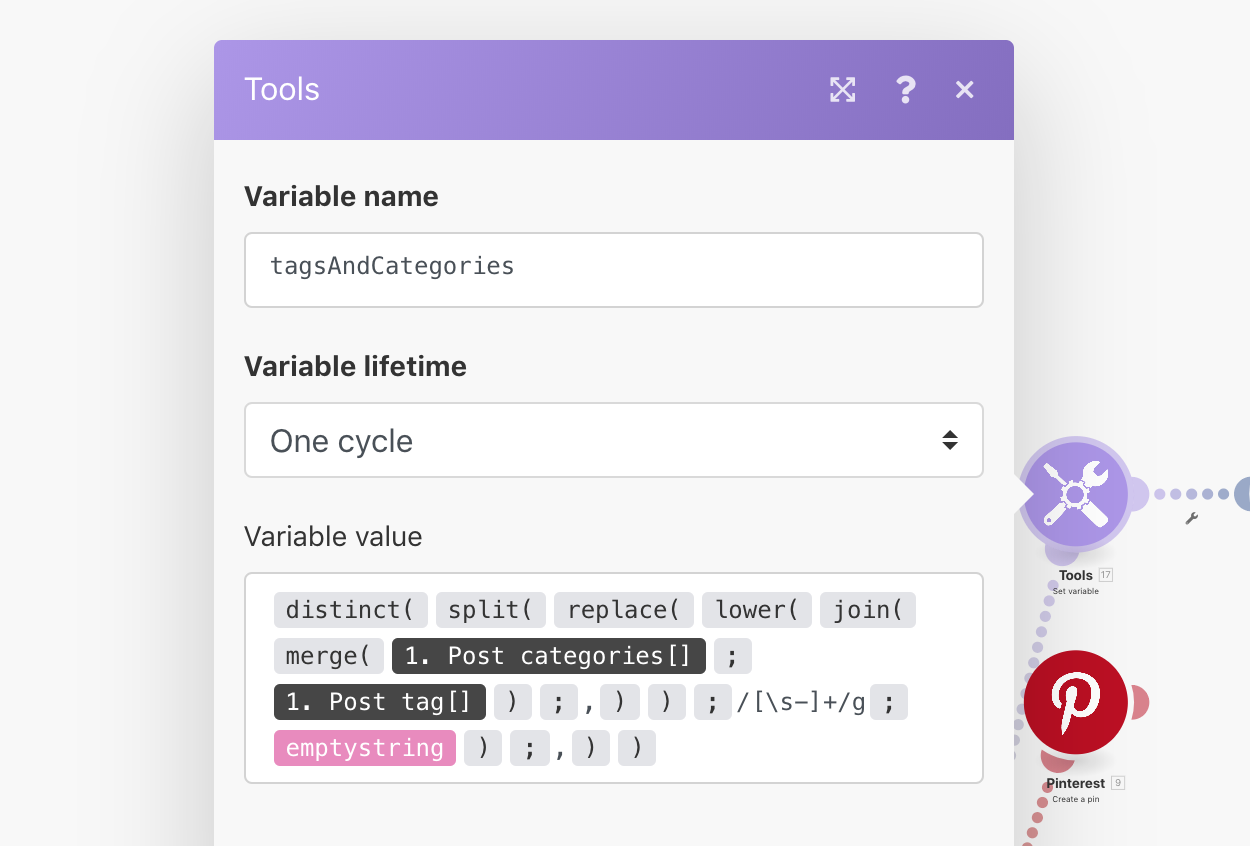
I only need this info for the Facebook Page operation so I've set its lifetime to One Cycle. Now the complicated bit (again, spaces added for legibility):
distinct(
    split(
        replace(
            lower(
                join(
                    merge(Post categories\[\];Post tag\[\])
                ;
                    ,
                )
            )
        ;
            /\[\\s-\]+/g
        ;
            emptyString
        )
    ;
        ,
    )
)
Fun times. You read this by working from the deepest indent backwards.
- Merge the categories and tag lists together into one list
- Convert it into a string of text separated by commas (ie. "tech,guide")
- Make them all lowercase (ie. "tech,Guide" becomes "tech,guide")
- Replace any spaces (\s) or hyphens (-) with an empty string (just get rid of them) (ie. "hyphenated-tag,other tag" becomes "hyphenatedtag,othertag")
- Split this text back into a list using the commas we added in 2
- Get only the distinct values (get rid of duplicates) (ie. "tech, tech, guide" becomes "tech, guide"
I'm pretty happy with this solution, it's a little more effort to set up, but the time it saves is pretty invaluable.